.png)
Dryer Vents, Lint and Fire Concerns.
- brennancoyle

- Sep 29, 2022
- 3 min read
Updated: Oct 14, 2022
There are some things in life that just never cross our minds or occur to us a potential threat to our life and safety. The fuzz that comes off of our socks and shirts is more than likely not high on the lists of things that seem dangerous.
However, 2,900 home clothes dryer fires are reported each year and cause an estimated 5 deaths, 100 injuries, and $35 million in property loss. Let's try not to be a statistic!

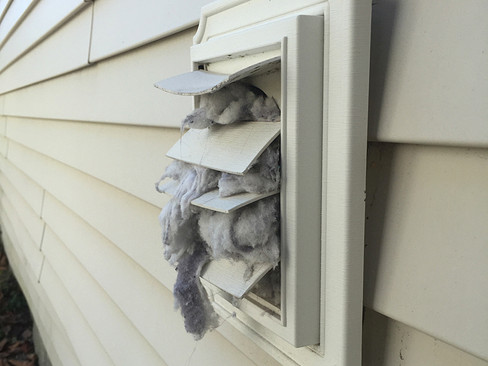
This picture illustrates the amount of lint (and this isn't the worst I've seen) that can build up inside your dryer vent and what it should look like when its clean.
Simple Cleaning and Maintenance.
Clean your vent and transition vent (flexy part) once a year.
I recommend that you clean your dryer vent at least once every year, some folks say every two years. I just find it simpler to stay up on the maintenance and not allow things to get out of hand.
Clean your vent cover and ensure proper operation once a year.
Check to see where your dryer vent exists your home and ensure that the vent cover (backdraft damper or louvered cover) is also clean, not clogged up with lint and is properly opening (when dryer is on) and closing (when dryer is off).
A properly opening/closing vent cover will allow both sufficient airflow for your dryer when in use and keep pests and birds from making a home inside your dryer vent when it's not in use.
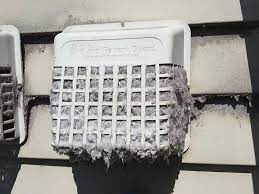
NOTE: Screened covers like the image on the right, or installation of metal screens or mesh is not permitted. I don't know why they even make them like that, but do not use them.
Check to make sure your transition vent is not kinked or damaged.
This is a very common one I find in a lot of homes. The transition vent is, in most cases, some kind of flexible metal or slinky type "pipe" that connects your dryer to the rigid ductwork that is hidden behind the walls and vents to the exterior.
More often than not, this vent is too long and is bent into some kind of serpentine pattern, or has been squished/kinked from the dryer being shoved into it or from personal belongings that fall behind the dryer and damage it.
If there are too many bends, u-turns or actually kinks, it reduces the flow of air through the vent and also allows for more places for lint to get caught and build up.
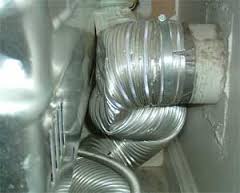
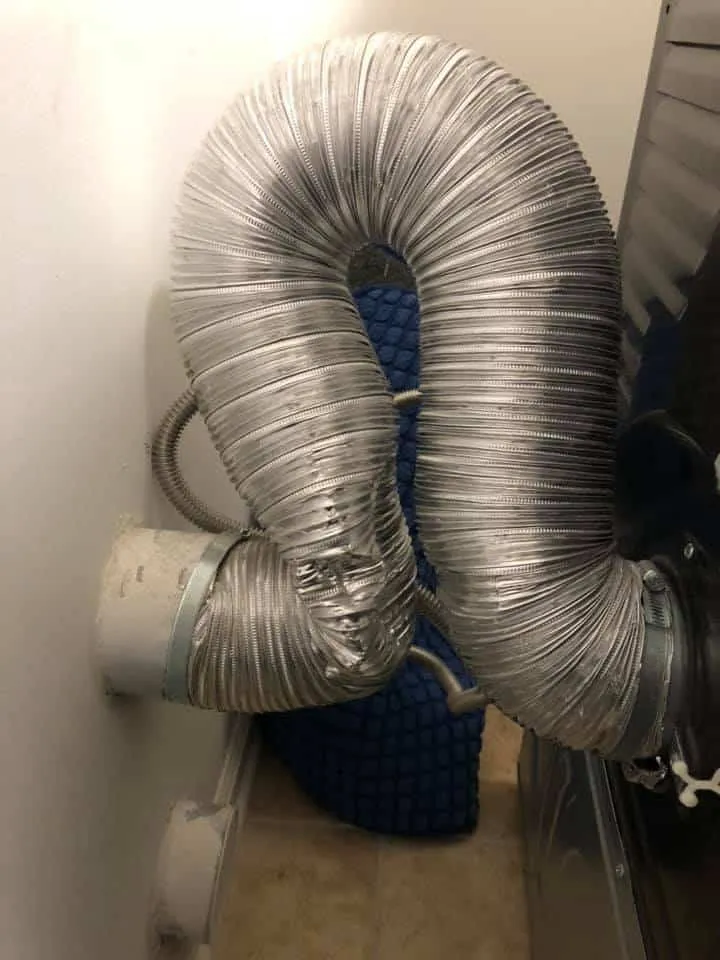
These two pictures illustrate what it should not look like.
Codes and Details for Dryer Vents
Transition Vents and Flex connectors.
Should be metal flex or aluminum foil flex. Plastic flex connectors should not be used.
Minimum 4" in diameter.
No longer than 8 feet in overall length.
Use minimum amount of bends to help ensure proper air flow.
Flexible vents are not permitted to be inside of walls, chases or inaccessible areas.
Dryer Ducting
Minimum 4" in diameter, smooth rigid duct.
Sleeved connections to be installed so the male/female connection flows inline with the direction of airflow.
No screws that penetrate further than 1/8" into duct work.
IRC max length of 25ft (*IMC max length of 35ft). Max length is reduced 2.5 feet for every 45 degree bend, and 5 feet for every 90 degree bend.
Supported every 4 feet.
Shield plates installed whenever duct is within 1.25" from framing surface.
Dryer Vent Termination
Must vent to the exterior.
Terminate is a louvered or backdraft damper (flapper style)
No screens installed over vent termination
Minimum 3 feet away from any doors, windows or hvac intake ducts.
Minimum 10ft away from exterior heat pump or a/c units. (to prevent lint built up on cooling fins)
*Condos Only
It is common for condo buildings to have a secondary lint trap installed to help prevent lint build up in what are typically longer runs of duct work for dryer venting.
They are usually seen as a "slim line" lint trap located on top of a stackable washer dryer unit and should be cleaned every 3-5 loads. Or they will be inside a little access hatch with a knob on it, located in the laundry room.
Here is a quick little video illustrating how to clean the type located behind the access hatch.
There are more code and details in relation to dryer ducts and proper venting for gas dryers. This, as always on this blog, is just to help get you started and be a little bit more informed.
Keep your dryer vents clean, properly sealed to the exterior and you wont have to fear the fuzz from your socks trying to burn down all your worldly possessions.


Comments